Step 0: The Foundation (Prerequisites)
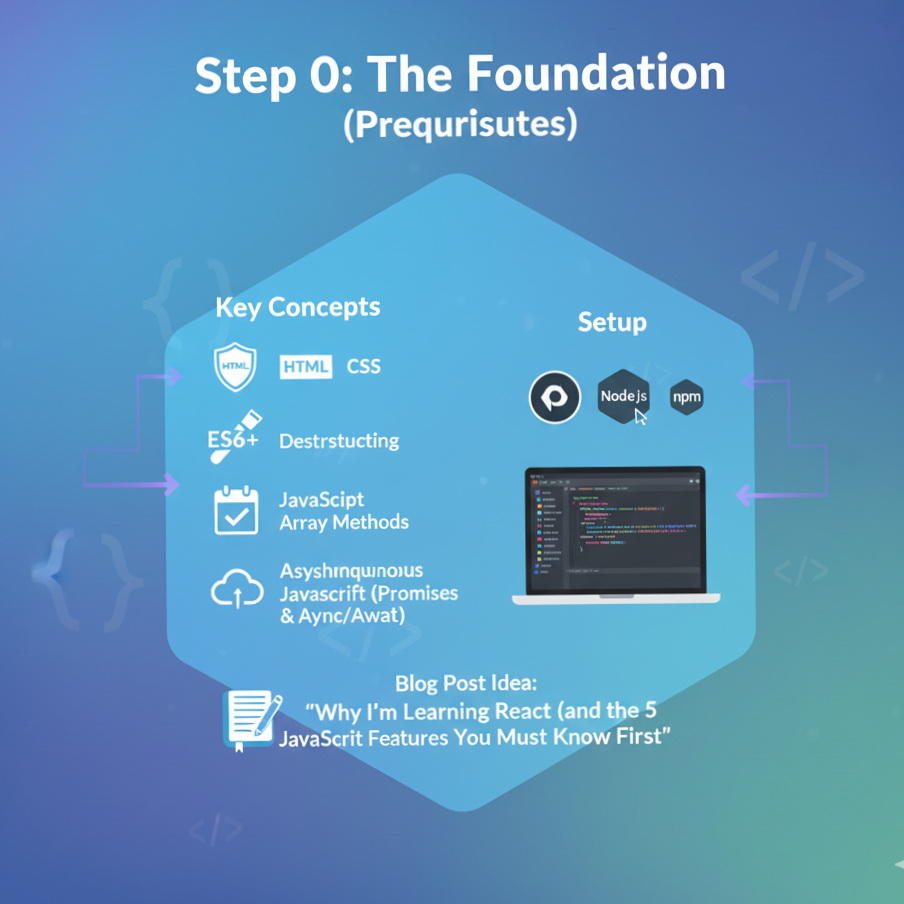
Before writing any React code, you must be comfortable with modern JavaScript.
- Key Concepts:
- HTML & CSS fundamentals.
- Modern JavaScript (ES6+):
let/constvs.var, Arrow Functions, Destructuring (objects & arrays), Template Literals. - JavaScript Array Methods:
.map(),.filter(),.reduce(). - Understanding
this(though less critical with modern hooks). - Asynchronous JavaScript: Promises &
async/await.
- Setup:
- Installing Node.js and npm (or pnpm/yarn).
- Setting up your code editor (like VS Code with extensions).
- Blog Post Idea: “Why I’m Learning React (and the 5 JavaScript Features You Must Know First)”
Step 1: React Fundamentals (The “What”)
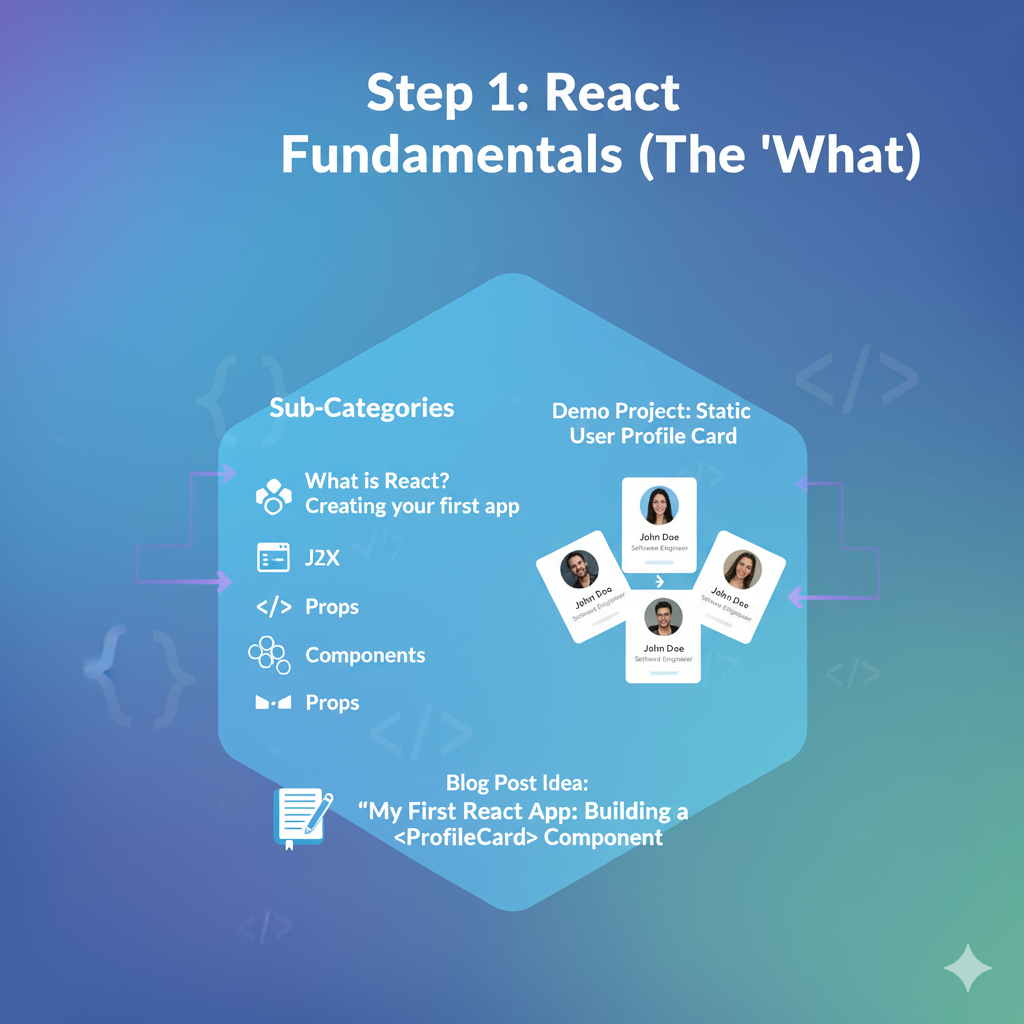
Goal: Understand what React is and how to build your very first components.
- Sub-Categories:
- What is React? (Component-based, declarative, Virtual DOM).
- Creating your first app (
npx create-react-app). - JSX: Writing HTML-like syntax inside JavaScript.
- Components: The core building blocks (Functional Components).
- Props: How to pass data down from a parent component to a child component.
- Styling React components (CSS files, inline styles).
- Demo Project:Static User Profile Card
- Create a reusable
<ProfileCard>component. - The parent
Appcomponent will pass data (likename,jobTitle,avatarUrl) as props. - You’ll build 3-4 static cards with different data.
- Create a reusable
- GO to details
Step 2: State & Interactivity (The “How”)
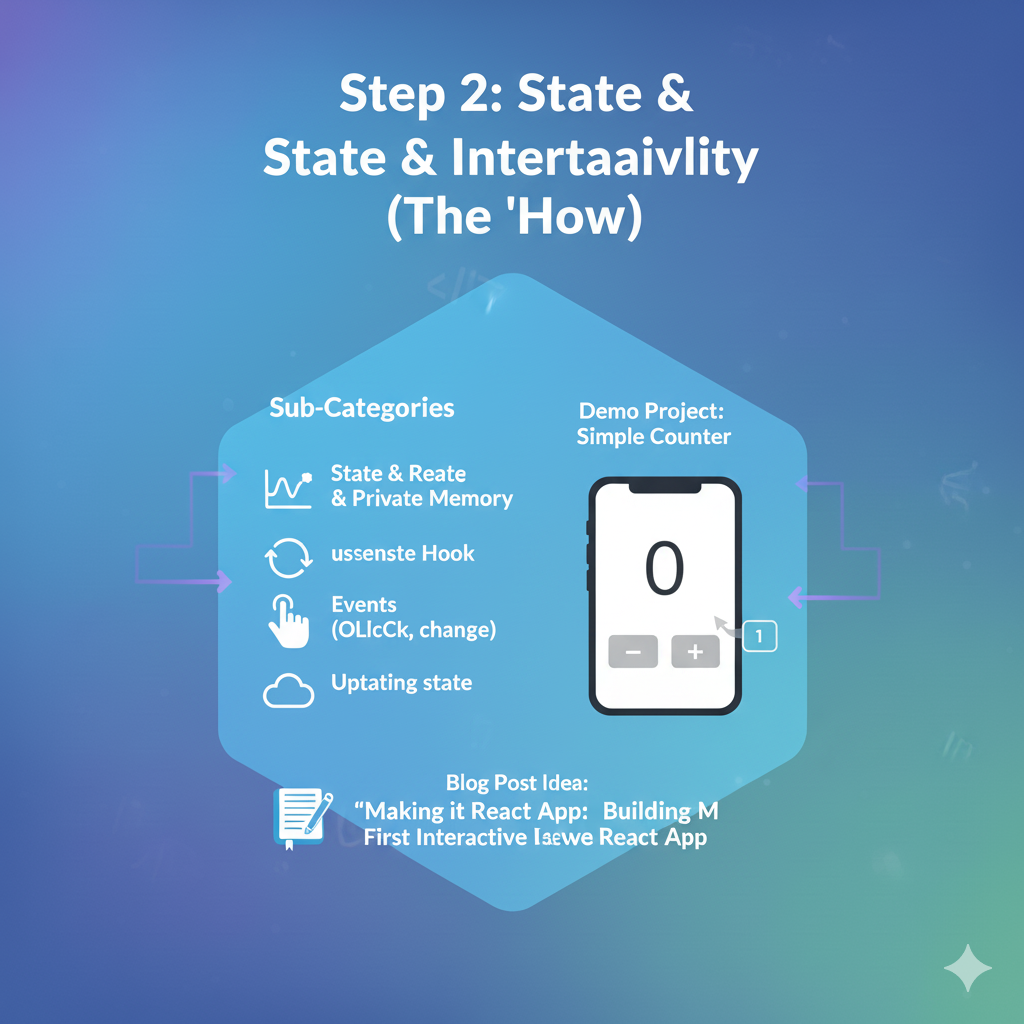
Goal: Make your components dynamic and interactive.
- Sub-Categories:
- State: Giving components their own private “memory.”
- The
useStateHook: The primary way to add state to a component. - Events: Handling user actions like
onClick,onChange, etc. - Updating state based on events.
- Demo Project:Simple Counter
- A component with a number displayed (
0) and two buttons (“Increment” and “Decrement”). - Clicking the buttons updates the state, which re-renders the component to show the new number.
- A component with a number displayed (
Step 3: Handling Lists & Forms (Building UIs)
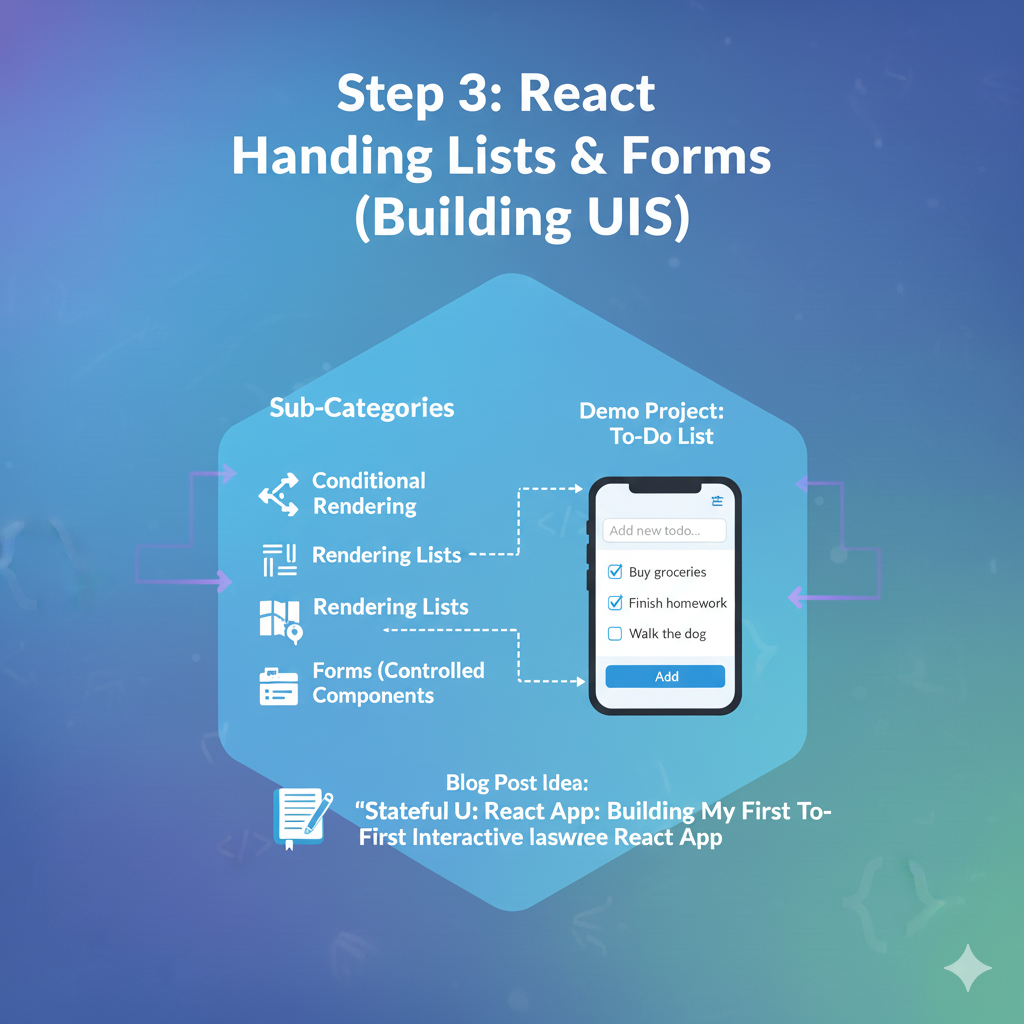
Goal: Work with dynamic data (like lists) and capture user input.
- Sub-Categories:
- Conditional Rendering: Showing/hiding JSX based on a condition (using
&&or ternary operators). - Rendering Lists: Using the
.map()array method to render a component for each item in an array. - The
keyprop: Why it’s essential for lists. - Forms: Creating “controlled components” by linking form inputs (
<input>,<textarea>) to state.
- Conditional Rendering: Showing/hiding JSX based on a condition (using
- Demo Project:Basic To-Do List
- An input field and an “Add” button.
- A list of to-do items rendered below.
- You’ll use state to manage the current input value and the array of all to-do items.
Step 4: Side Effects & Data Fetching (The “Real World”)
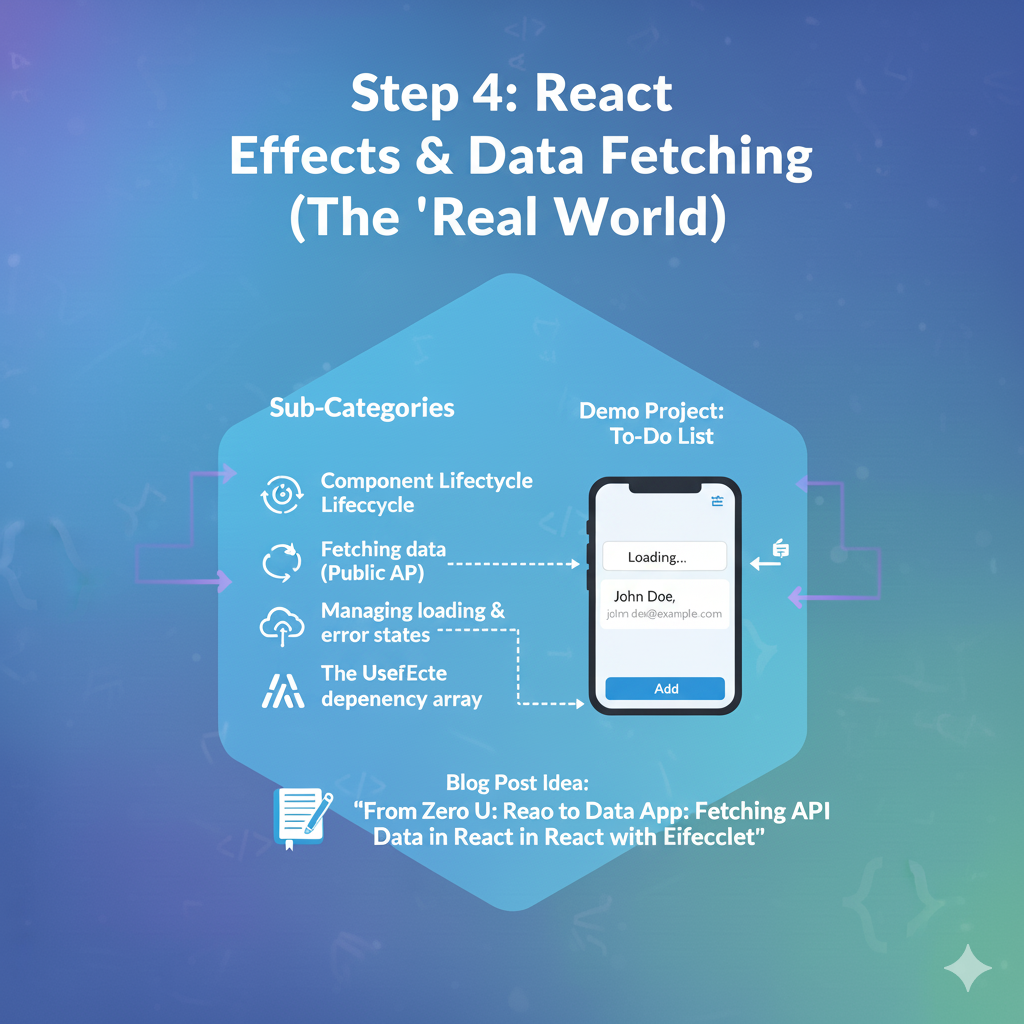
Goal: Interact with the “outside world,” like fetching data from an API.
- Sub-Categories:
- Component Lifecycle (simplified: Mount, Update, Unmount).
- The
useEffectHook: The hook for running “side effects.” - Fetching data from a public API (e.g., using
fetch()). - Managing loading and error states.
- The
useEffectdependency array: How to control when your effect re-runs.
- Demo Project:Simple Data Fetcher
- On component mount, use
useEffectto fetch data from a public API (like a random joke API or a user API likehttps://jsonplaceholder.typicode.com/users/1). - Display a “Loading…” message while fetching.
- Display the fetched data (e.g., the user’s name and email) once it arrives.
- On component mount, use
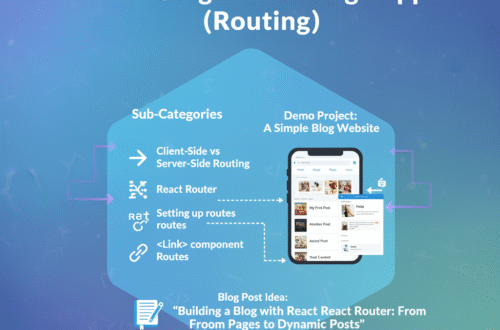
Step 5: Structuring a Multi-Page App (Routing)
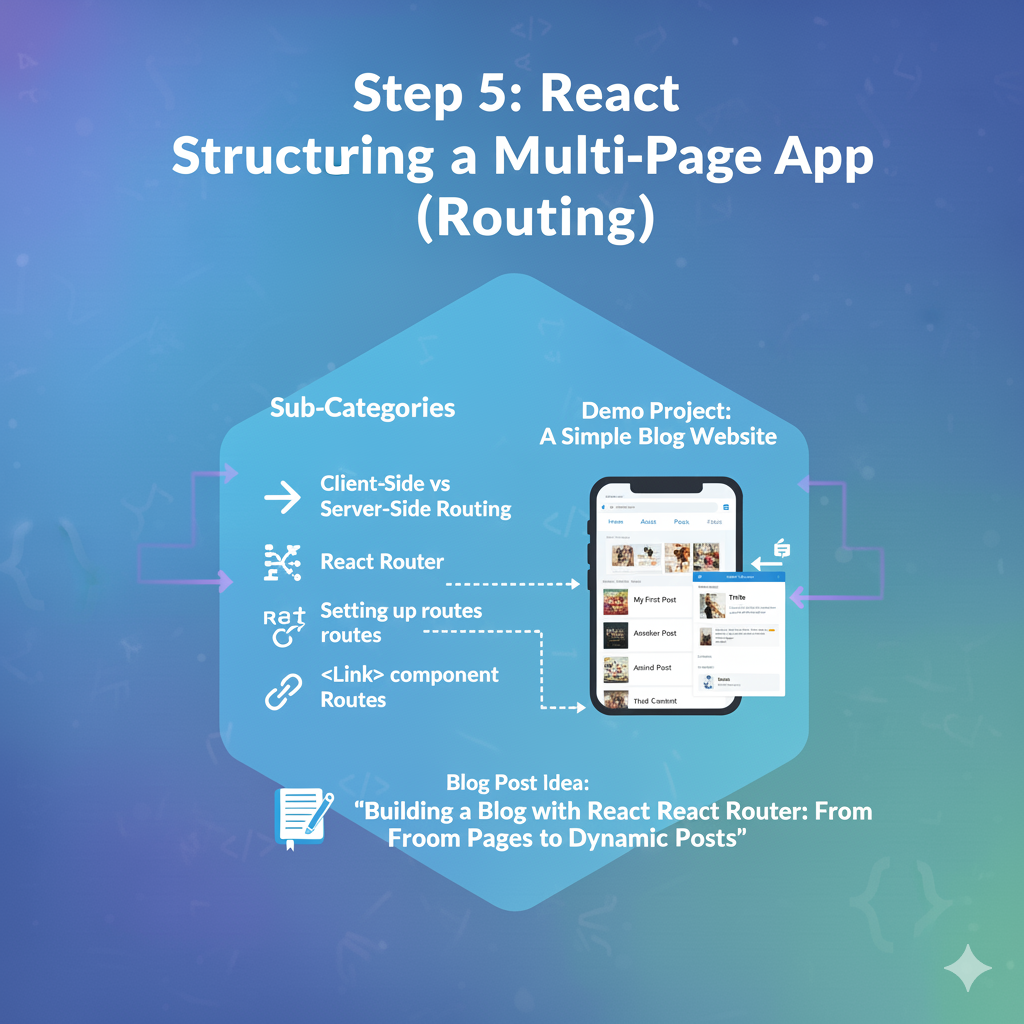
Goal: Create an application with multiple “pages” or views.
- Sub-Categories:
- Client-Side vs. Server-Side Routing.
- React Router: The standard library for routing.
- Setting up routes (
<BrowserRouter>,<Routes>,<Route>). - Linking between pages (
<Link>component). - Dynamic Routes: Creating pages from parameters (e.g.,
/users/:id).
- Demo Project:A Simple Blog Website
- Create a site with three pages: “Home,” “About,” and “Posts.”
- The “Posts” page will list blog titles.
- Clicking a title will take you to a dynamic route like
/posts/1or/posts/2to show the post detail.
Step 6: Deeper State Management (Sharing State)
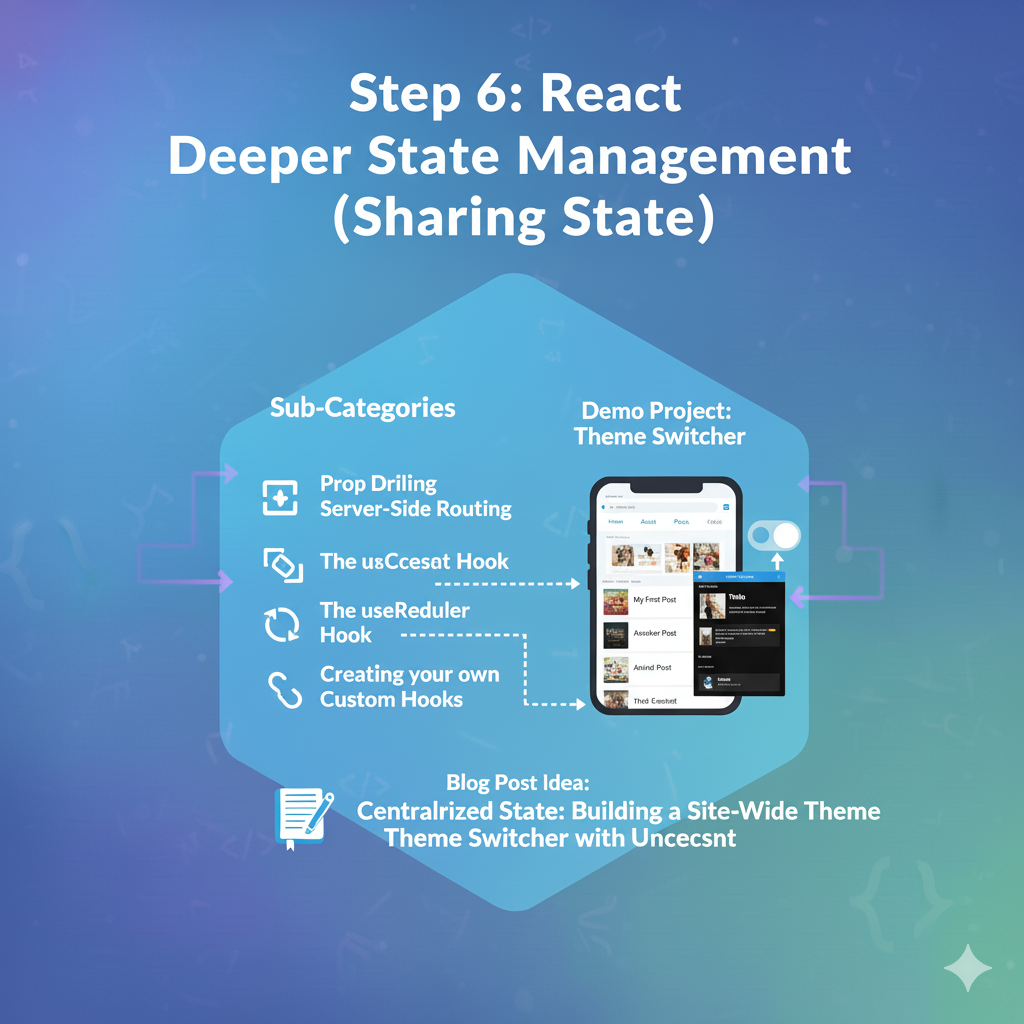
Goal: Manage state that needs to be shared across many components.
- Sub-Categories:
- “Prop Drilling”: What it is and why it’s a problem.
- The
useContextHook: A built-in way to pass data deeply without prop drilling. - The
useReducerHook: For managing more complex state logic (an alternative touseState). - Creating your own Custom Hooks to reuse stateful logic.
- Demo Project:Theme Switcher
- Use
useContextto create a global “theme” (e.g., ‘light’ or ‘dark’). - Create a button in your navigation bar (from the previous project) that can toggle this theme.
- All components in your app should consume this context to change their styles.
- Use
Step 7: Performance Optimization (Making it Fast)
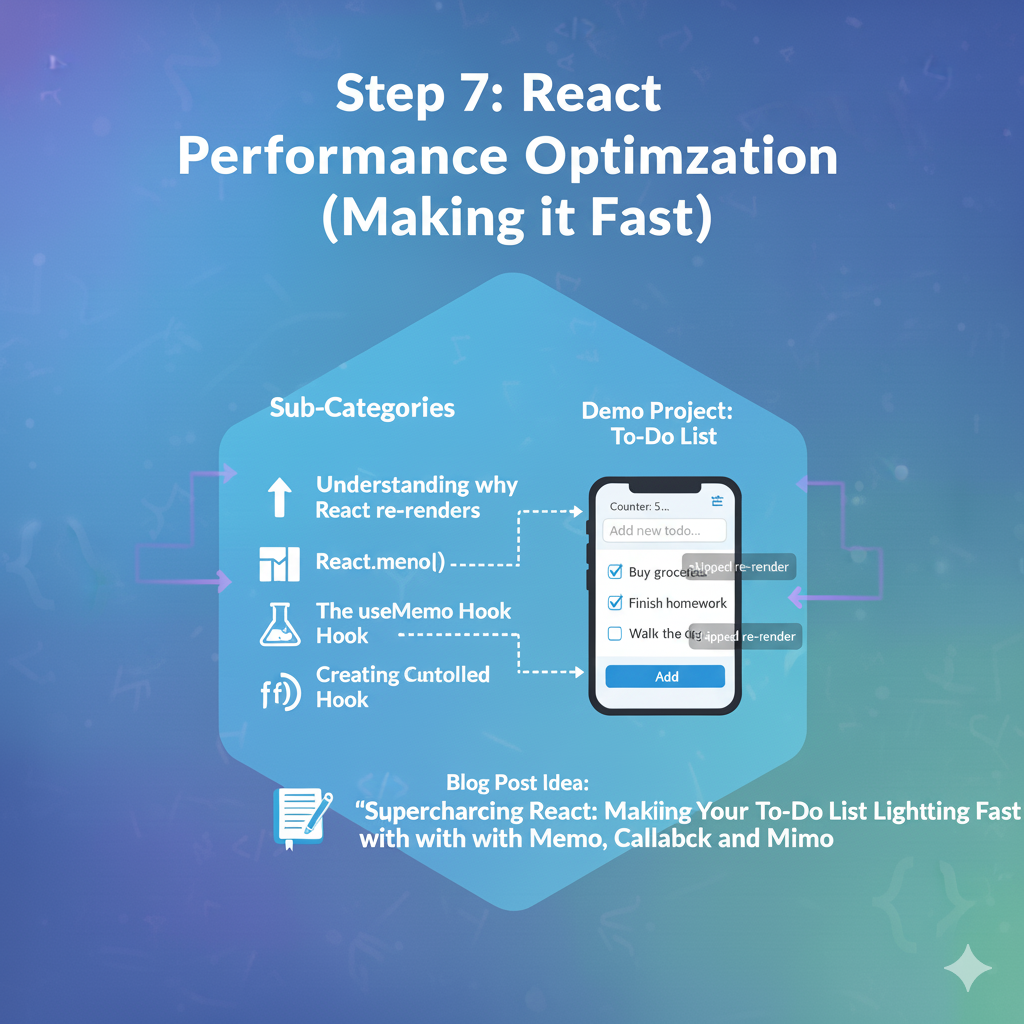
Goal: Prevent unnecessary re-renders and speed up your app.
- Sub-Categories:
- Understanding why React re-renders.
React.memo(): Preventing components from re-rendering if their props haven’t changed.- The
useMemoHook: Memoizing (remembering) the result of an expensive calculation. - The
useCallbackHook: Memoizing a function definition to prevent child components from re-rendering.
- Demo Project:Optimized To-Do List
- Refactor your To-Do List from Step 3.
- Add a feature (like a counter that updates every second) that causes the
Appto re-render often. - Use
console.logto see your To-Do items re-rendering unnecessarily. - Apply
React.memo,useMemo, anduseCallbackto stop the list items from re-rendering when they don’t need to.
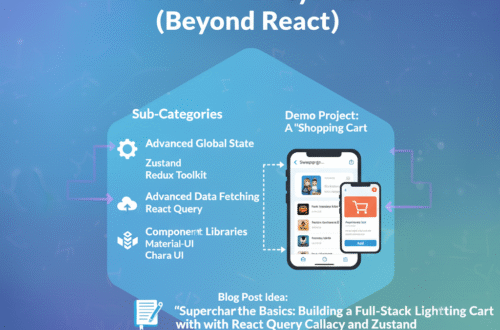
Step 8: Advanced Ecosystem (Beyond React)
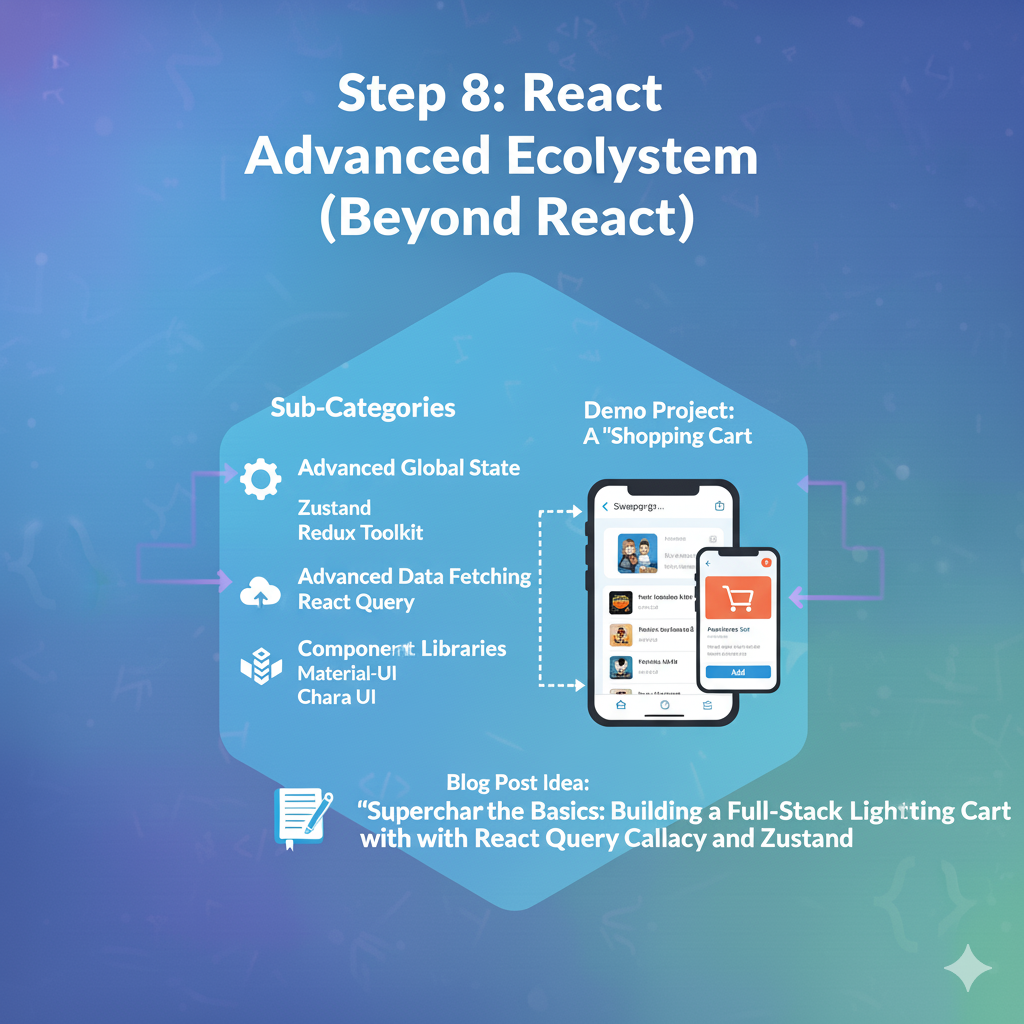
Goal: Learn the powerful libraries that solve common, complex problems.
- Sub-Categories:
- Advanced Global State: Introduction to libraries like Zustand (simple) or Redux/Redux Toolkit (powerful).
- Advanced Data Fetching: Introduction to React Query / TanStack Query. It handles caching, re-fetching, and server state management for you.
- Component Libraries: Using a pre-built library like Material-UI, Chakra UI, or Tailwind CSS to build UIs faster.
- Demo Project:A “Shopping Cart”
- Fetch a list of products from an API using React Query.
- Build a “Product List” page and a “Product Detail” page.
- Use Zustand to manage the global “cart” state.
- Allow users to add/remove items to the cart from any page.
Step 9: Testing & Next-Level Patterns
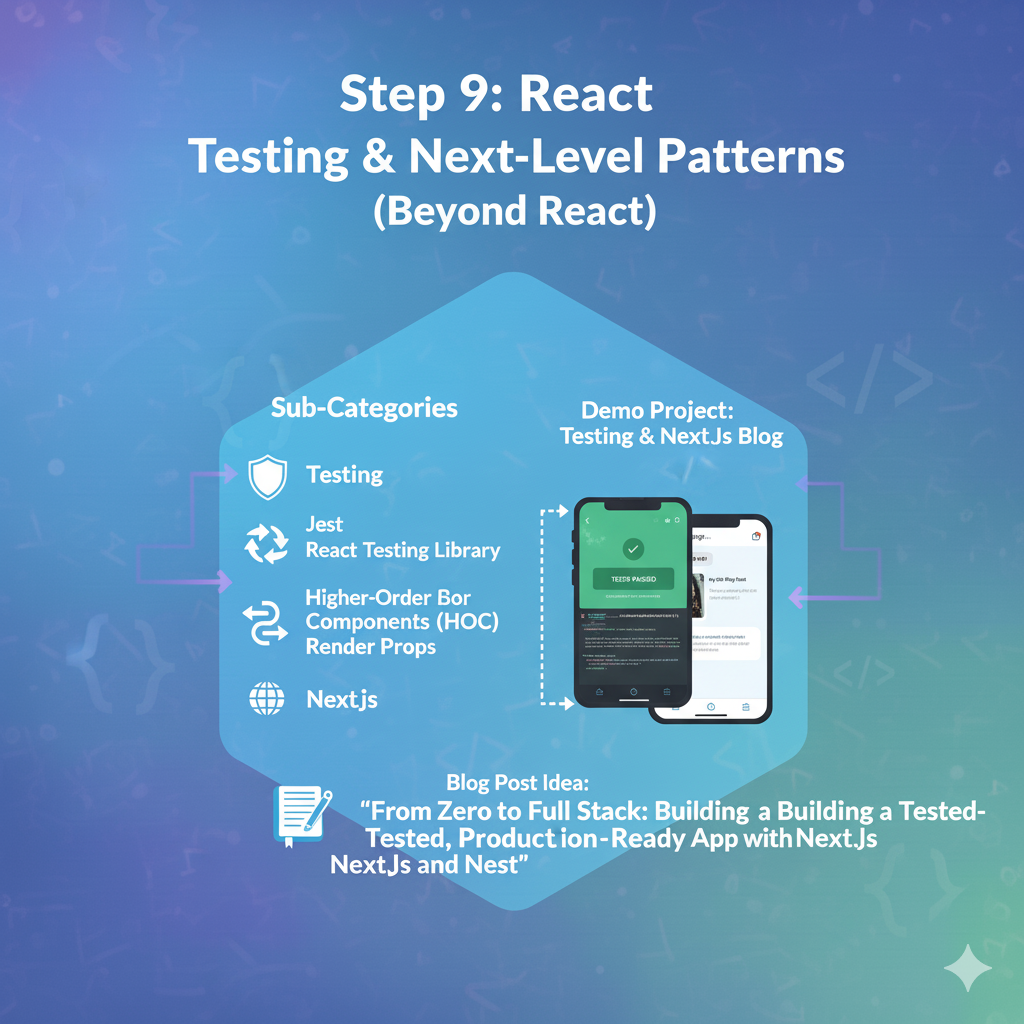
Goal: Ensure your app works correctly and explore advanced architectures.
- Sub-Categories:
- Testing: Writing unit and integration tests with Jest and React Testing Library.
- Advanced Patterns: (For blogs) Higher-Order Components (HOCs), Render Props.
- Server-Side Rendering (SSR): Introduction to a framework like Next.js.
- Demo Project:
- Write tests for your “Counter” and “To-Do List” apps.
- Re-build your “Blog Website” (from Step 5) using Next.js to learn SSR/SSG.
This roadmap will take you from writing “Hello, World” to building a complex, optimized, and tested application.